Pages

Tuesday 5 July 2016

How to Shift Blogger Navigation Tabs to the Top of Page

Are you looking for a way to move navigation Page Bar above the header of your blog? You've come to the right place! Today many bloggers aspire to give their blog an exceptional look and that is why they are always in a try to break a new ground. Isn't it! Normally in a blogspot blog the navigation page tabs appear below header but you want to place them above header to mark a more professional look. Out with the old and in with new. Also in other professional and social media sites, we can see menu bars at the top. So we decided to teach you a simplest trick to make your blogger tabs bar the top-most part of page. Have a look!

This post includes two parts; first part explains, how to move tabs up above header and second part explains, how to make them sticky.

Part A: Moving your Tabs above Header
  1. Head to the TEMPLATE section.
  2. Click EDIT HTML.
  3. Search for the code </header>
  4. Copy and remove the following code just below it.
<div class='tabs-outer'>
<div class='tabs-cap-top cap-top'>
<div class='cap-left'/>
<div class='cap-right'/>
</div>
<div class='fauxborder-left tabs-fauxborder-left'>
<div class='fauxborder-right tabs-fauxborder-right'>
<div class='region-inner tabs-inner'>
<b:section class='tabs' id='crosscol' maxwidgets='1' name='Cross-Column' showaddelement='yes'
<b:widget id='PageList1' locked='false' title='Pages' Type='PageList' visible='true'>...</b:widget>
</b:section>
<b:section class='tabs' id='crosscol-overflow' name='Cross-Column 2' showaddelement='no'/>
</div>
</div>
<div class='tabs-cap-bottom cap-bottom'>
<div class='cap-left'/>
<div class='cap-right'/>
</div>
</div>

 N.B: Remove the above code after copying it. If you paste it to the other section without removing from here you will receive an error message which won't allow you to save the template.

More than one section was found with id: crosscol. Section IDs should be unique 

5. Now search for the code  <header>
6. Paste the copied code right above it.
7. Save the Template and view your blog.

If you see an extra top space above the bar use the following tutorial to reduce it.


Part B: Make your Page Bar Sticky
Want to make your navigation/menu bar sticky? Use this method to allow it to stick to the top whenever a visitor scrolls down your blog page. Follow the below steps;
  1. Go to the Template Edit Html Section
  2. Use Ctrl=F to Search for the code ]]></b:skin>
  3. Paste the following piece of code just above it.
.tabs-inner .widget ul {
background: #2ecc71;
border: 0px solid #2ecc71;
text-align: center !important;}

.tabs .widget li, .tabs.widget li{
display: inline;
float: none;}

.tabs-inner .widget {position: fixed; width: 100% ; border-top: 0px,  top: 0px; left: 0px; z-index: 100;} 

4. Mitigation Step:
Replace the color code (mentioned in green in above code) with your tab color.  

5. Hit the SAVE TEMPLATE button and view your blog. 

Last Comments
So we learned an interesting trick today that will surely bring your blog on the crest of wave. We defined two parts here in this post; after completing which you will be able to make tabs sticky and show them up above the blog header. Enjoy the trick and share it with your friends. Have queries regarding this post? Put them into the below comment box. Stay Blessed :)

Monday 4 July 2016

4 Best Ways to Remove Powered By Blogger Attribution Gadget

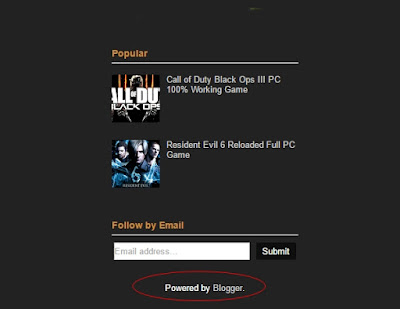
Looking for a way to remove Blogger Attribution Gadget from your blog? Here comes the solution! Being a Blogspot user, you're to come across many of its default features and you are always in a try to disable them. Isn't it? An attribution gadget shows a message Powered by Blogger at the bottom of page or elsewhere depending on its placement in the Layout. Normally you are provided with an option to remove gadgets from your blog but the situation becomes quite problematic when it comes to an attribution gadget. Here in this post, we prepared the simplest recipes to help removing this feature. Have a look! 

Method 1 (Add CSS)
  1. Head to your TEMPLATE Section.
  2. Click on EDIT HTML.
  3. Search for ]]></b:skin> and paste the following piece of code right above it.

#Attribution1 {
display: none;
}

Click the save button and view the result.


Method 2 (Add code under style tags)
  1. Go to your template edit html section. (same as mentioned in Method 1)
  2. Find </head> and paste the following code just above it.

<style type='text/css'>
#Attribution1 {display:none !important;}
</style>

3. Save the template and view the results.
4. Bingo, you hit a home run!


Method 3 (Adding an additional Remove Option)


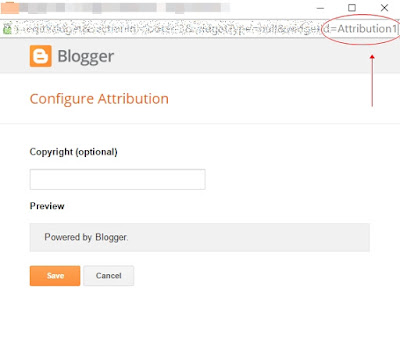
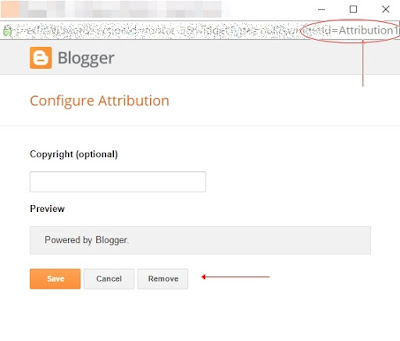
Normally when you pay visit to the LAYOUT section of your blog and click Edit on the Attribution gadget, you see no option for its removal (as shown in figure). This method will help you out to add a removal option in the small window which opens right after you click Edit on the gadget. Also observe the name/ID 'Attribution1' in the picture, this will help searching in coming steps.
  1. Go to Template EDIT HTML section.
  2. Click on JUMP To WIDGET and go to Attribution1
  3. You will find the following piece of code.

<b:section class='foot' id='footer-3' name='Footer' showaddelement='no'>
<b:widget id='Attibution1' locked='false' title='' type='Attribution' visible='true'>

Mitigation Steps
  1. Replace 'no' (mentioned in green) with 'yes'. 
  2. If you find locked='true' in the above code change it to locked='false'.
  3. Click the save button.

4. Now come to the LAYOUT section of your blog. 
5. Move on to the Attribution gadget and click Edit on it.
6. Now that the small window will come open with the REMOVE option.
7. Remove it and click the SAVE ARRANGEMENT button at top right corner.
8. You are done! 

Method 4 (Remove the whole html code)

  1. First two steps same as mentioned in Method 3.
  2. Jump to the Attribution1 widget.
  3. Select the following piece of code in between b:widget tag and remove it.

<b:widget id='Attribution1' locked='false' title='' type='Attribution visible='true'>
<b:includable id='main'>
<b:if cond='data:feedbackSurveyLink'>
<div class='mobile-survey-link' style='text-align:center;'>
<data:feedbackSurveyLink/>
</div>
</b:if>

<div class='widget-content' style='text-align: center;'>
<b:if cond='data:attribution != &quot;&quot;'>
</b:if>
</div>

<b:include name='quickedit'/>
</b:includable>
</b:widget>

Save the template and view your blog.

Last Comments
Now you can see that it's quite surmountable to deal with the Attribution gadget with all above stated four methods. All them will do the job perfectly! Try one of them and share your experience with us. Have queries regarding this post? put them into the below comment box. Enjoy your success and don't forget to share it with your friends. Stay Blessed :) 

Saturday 2 July 2016

How to Remove the Blogger Feed Links Subscribe to: Posts or Post Comments Atom

Looking for a simplest way to remove the Feed Links below the posts and post comments from your blogger? Here comes the solution! Many bloggers do not feel like showing their blog as a Blogger Blog and they always find ways to remove its default features. One such feature is the appearance of feed links both under the posts in home page as Subscribe to: Posts (Atom) and the comment box of a post as Subscribe to: Post Comments (Atom). Here in this post we prepared easiest recipes to get rid of above mentioned default links. Have a Look!

This includes two parts; the first part explains, how to hide these links and the seconds part explains, how to delete them.

Part A: How to Hide Blogger Feed Links?

Method 1 (Add code under Style tags)

  1. Head to TEMPLATE section.
  2. Click on EDIT HTML.
  3. Just click on the html window and press Ctrl+F.
  4. Search for </head> in the html search bar and paste the following code right above it.
<style type='text/css'>
.feed-links {display:none !important;}
</style>

Click the SAVE TEMPLATE button, take a look on your blog and observe the results. Success seems in your bag!

Method 2 (Add CSS)

  1. All three steps same as mentioned in Method 1.
  2. Search for ]]></b:skin> and paste the following code just above it.
.feed-links {display:none !important;}

You are done!

Part B: How to remove Blogger Feed Links?

Method 1 (Remove Both of them)

  1. Head to your TEMPLATE section.
  2. Ctrl+F the following piece of code.

<b:include data='feedLinks' name='feedLinksBody'/>

3. Delete the whole below code.

<b:if cond='data:blog.pageType != &quot;item&quot;'> <!--Blog feed links -->
<b:if cond='data:feedlinks'>
<div class='blog-feeds'>
<b:include data='feedLinks' name='feedLinksBody'/>
</div>
</b:if>

<b:else/> <!-- Post feed Links -->
<div class='post-feeds'>
<b:loop values='data:posts' var='post'>
<b:include cond='data:post.allowComments and data:post.feedLinks' data='post.feedLinks' name='feedLinksBody'/>
</b:loop>
</div>
</b:if>
</b:includable>
<b:includable id='feedLinksBody' var='links'>
<div class='feed-links'>
<data:feedLinksMsg/>
<b:loop values='data:links' var='f'>
<a class='feed-link' expr:href='data:f.url' expr:type='data:f.mineType' target='_blank'><data:f.name/> (<data:f.feedType/>)</a>
</b:loop>
</div>

4. Click the save button.

Method 2 (Remove either of the links separately)
For those who want to have one of the feed links and remove the second one, they can remove either of the links separately by using this method.

To remove 'Subscribe to: Posts (Atom), search the following piece of code and remove it.

<b:include data='feedLinks' name='feedLinksBody'/>

To remove 'Subscribe to: Post Comments (Atom), search for the following piece of code and remove it.

<b:include cond='data:post.allowComments and data:post.feedLinks' data='post.feedLinks' name='feedLinksBody/>


Comments
For both the hiding and removal process, we defined two methods each. All of them will do the job and things will come up roses. Have queries? Feel free to ask! We will assure you the best of our services. Enjoy your success and don't forget to share your feedback. Stay connected :)

Friday 1 July 2016

How to Remove an Extra Top Space in Blogger

Feeling a bit low with an extra space right above the header of your blogger blogpsot? Here comes the solution! Normally when a blogspot user applies a default theme to his/her blog, a navigation bar shows up at the top of page which if removed leaves a blank space. That space becomes quite noticeable in an intrusive way to the visitors. So the bloggers do have a desire to reduce this unoccupied gap between the header top and browser bar. Here in this post we included an easy and step-wise explanation on, how to remove it. Have a look!

Actually this includes two parts; the first part is for the removal of navigation bar and the second one for the reduction of leftover space.  

Part A: Steps to remove the top navigation bar in blogger
  1. Head to the LAYOUT section.
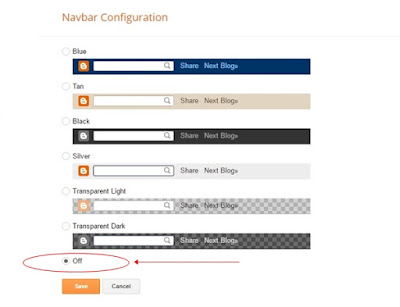
  2. Click on EDIT button of NAVBAR gadget. (A new window will open that offers you to off this gadget.)
  3. Mark the OFF option and save it. 

Part B: Methods to reduce the leftover space.

Method 1

1. Head to your TEMPLATE section.
2. Click on EDIT HTML.
3. Just click on html window and press Ctrl+F. (A bar will show up at the top right corner of the same window.)
4. Search the following piece of code in the bar.

.content-inner

5. The whole code looks like.

.content-inner {

padding:0;

}

6. Now paste the following code right below the above mentioned code.

.content-inner {

Margin-top: -30px !important;

}

7. Adjust spacing according to your taste by changing the figure mentioned in red in the above code.
8. Press the SAVE TEMPLATE button and you are done!
9. If you do not find the code mentioned in step 4 then search for ]]></b:skin>
10. Paste the required code (mentioned in step 6) just above it.


Method 2 (same as Method 1 but with the slight change in code)
1. Search for </head> in the html search bar.
2. Paste the following code right above it. 

<style type='text/css'>
</style>

3.Copy the same piece of code as mentioned in the sixth step of method 1 and paste it in between 'text/css'> and </style> of the above code.

4. You are done!

Comments
So there are two ways to reduce the above space of header. Either way will do the job! Sometimes the code mentioned in method 1 may not work out in custom blogger templates. In that case the opportunity of method 2 could be availed. Enjoy your success, do fill the below comment box with your precious feedback and don't forget to share it with your friends. Stay Connected :)